
Publishing creates a scheduled course from your course template. It sets up all the lessons, assigns the instructor and the location, and makes the course available for pet enrolments.
Before you publish, you need:
- A course template, created from Courses with New, then New Course Template. See Creating Your First Course Template.
- A team member to teach, one of the template's eligible instructors.
- A location: a resource where the course is held, or a street address.
- A start date for the first lesson.
Publish a new course
The form has three steps: Course Setup, Scheduling and Review & Publish.
- Open Courses, select New, then Publish New Course.
- On Course Setup, choose the Course Template, the Team Member and the Location, then select Next.
- On Scheduling, set the Start Date and Start Time, and check the lesson dates listed.
- Select Check Availability, and resolve any conflicts it finds.
- Select Next. On Review & Publish, check the course, then select Publish New Course.
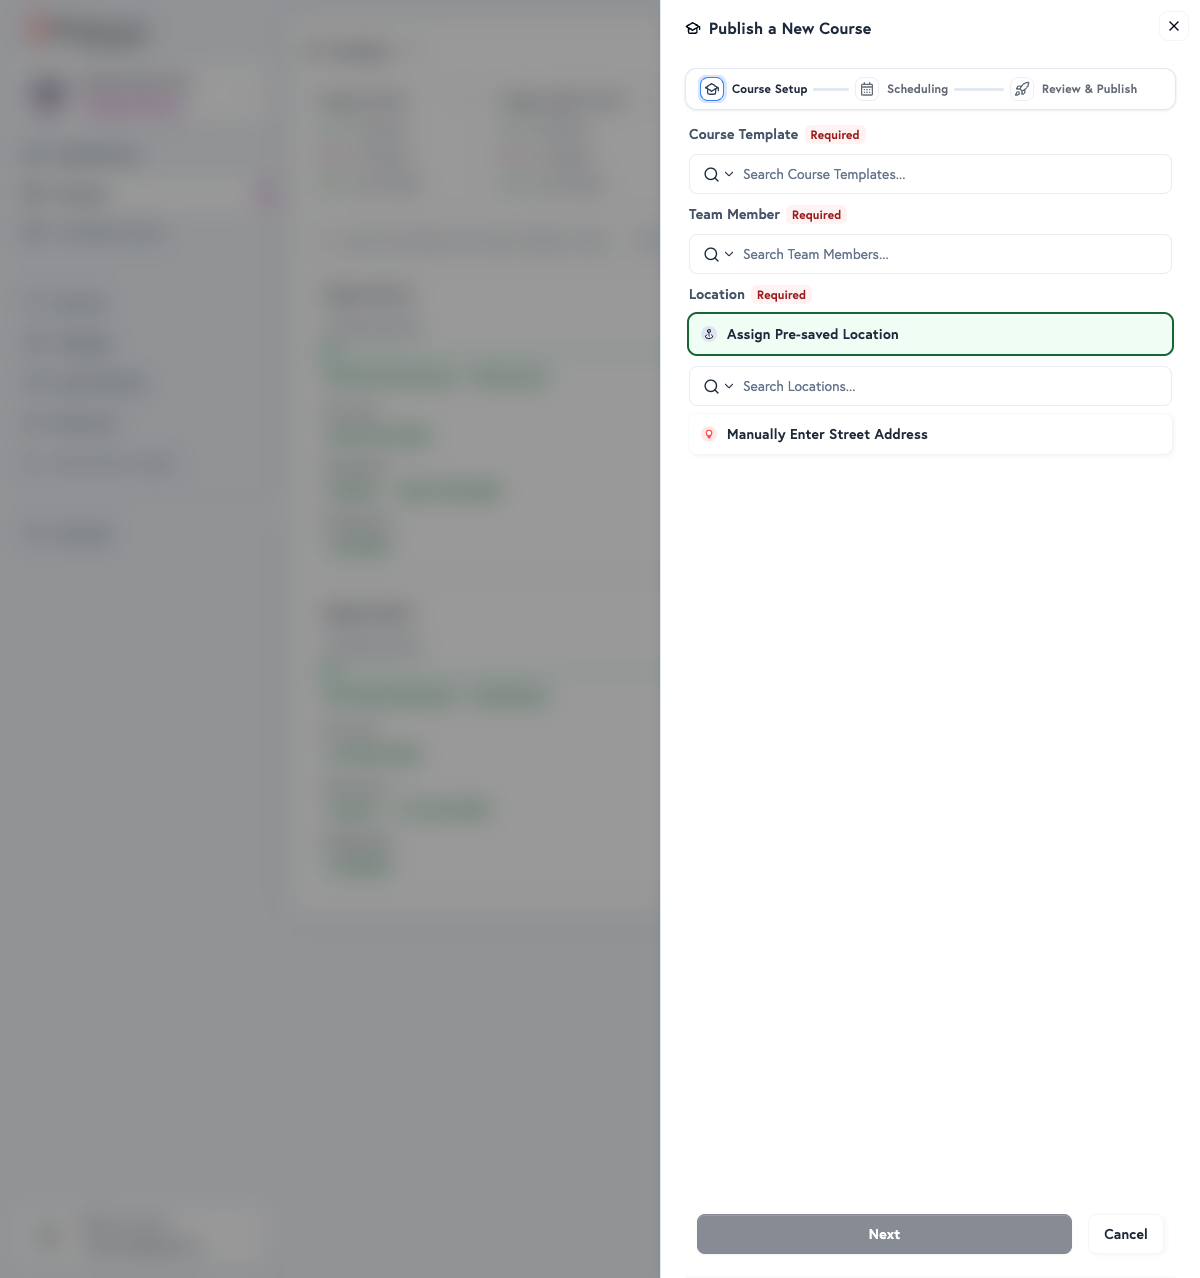
The link Create New Course opens the same form, and Publish New Course in a course template's Manage menu opens it with the template chosen.
Course Setup
The Course Template, such as Puppy School or Puppy High School, sets the course name and structure, the number of lessons, the lesson duration, the capacity and the service requirements.
The Team Member list shows the template's eligible instructors, marked Eligible only. If the template has none, the form says This template has no eligible instructors and offers Manage Team Members. Choose someone comfortable with group instruction, available for every lesson date, and with capacity for another course.
For the Location, choose Assign Pre-saved Location to pick one of your resources, such as a training room or an outdoor space, which brings its address and checks its capacity. Choose Manually Enter Street Address for a special venue or an off-site location; a typed address is not checked for availability. Use pre-saved locations where you can, so resource use is tracked and clashes are caught.
Scheduling
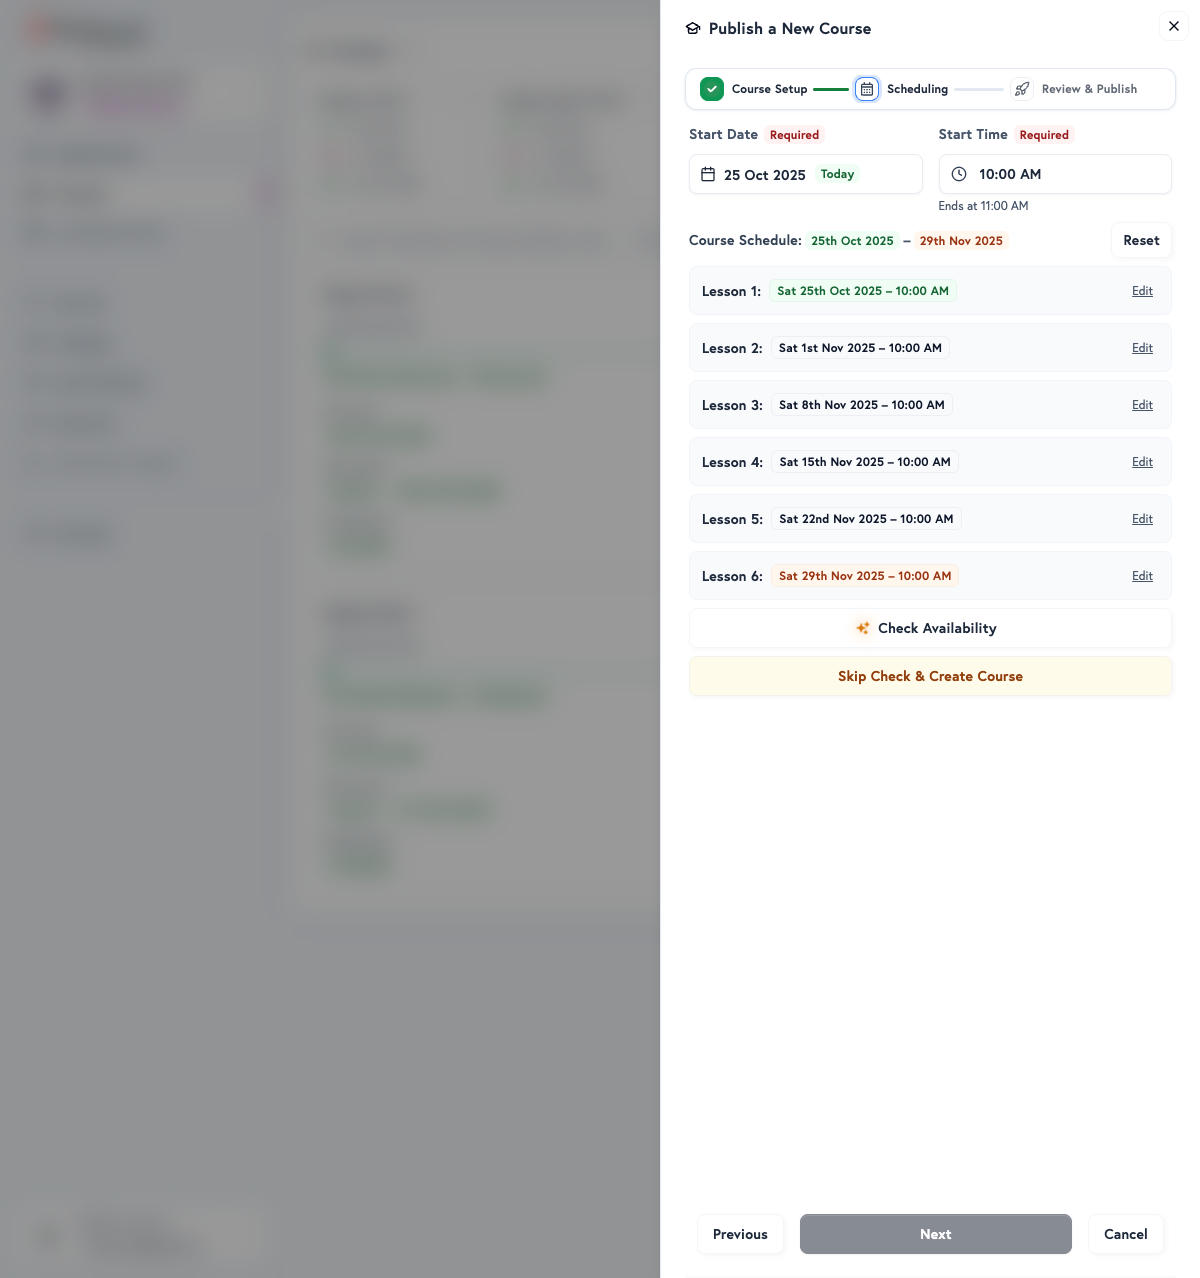
The Start Date starts on today and the Start Time on 10:00 am. The time applies to every lesson, the duration comes from the template, and the end time is worked out for you: a 10:00 AM start with a one-hour duration runs from 10:00 AM to 11:00 AM. Leave time for enrolments, and allow for holidays and your instructor's availability.
Petboost lists every lesson date from the start date and time, the template's recurrence pattern, such as weekly or fortnightly, and its number of lessons. Select Edit on a lesson to move its date or time, for example to skip a holiday week.
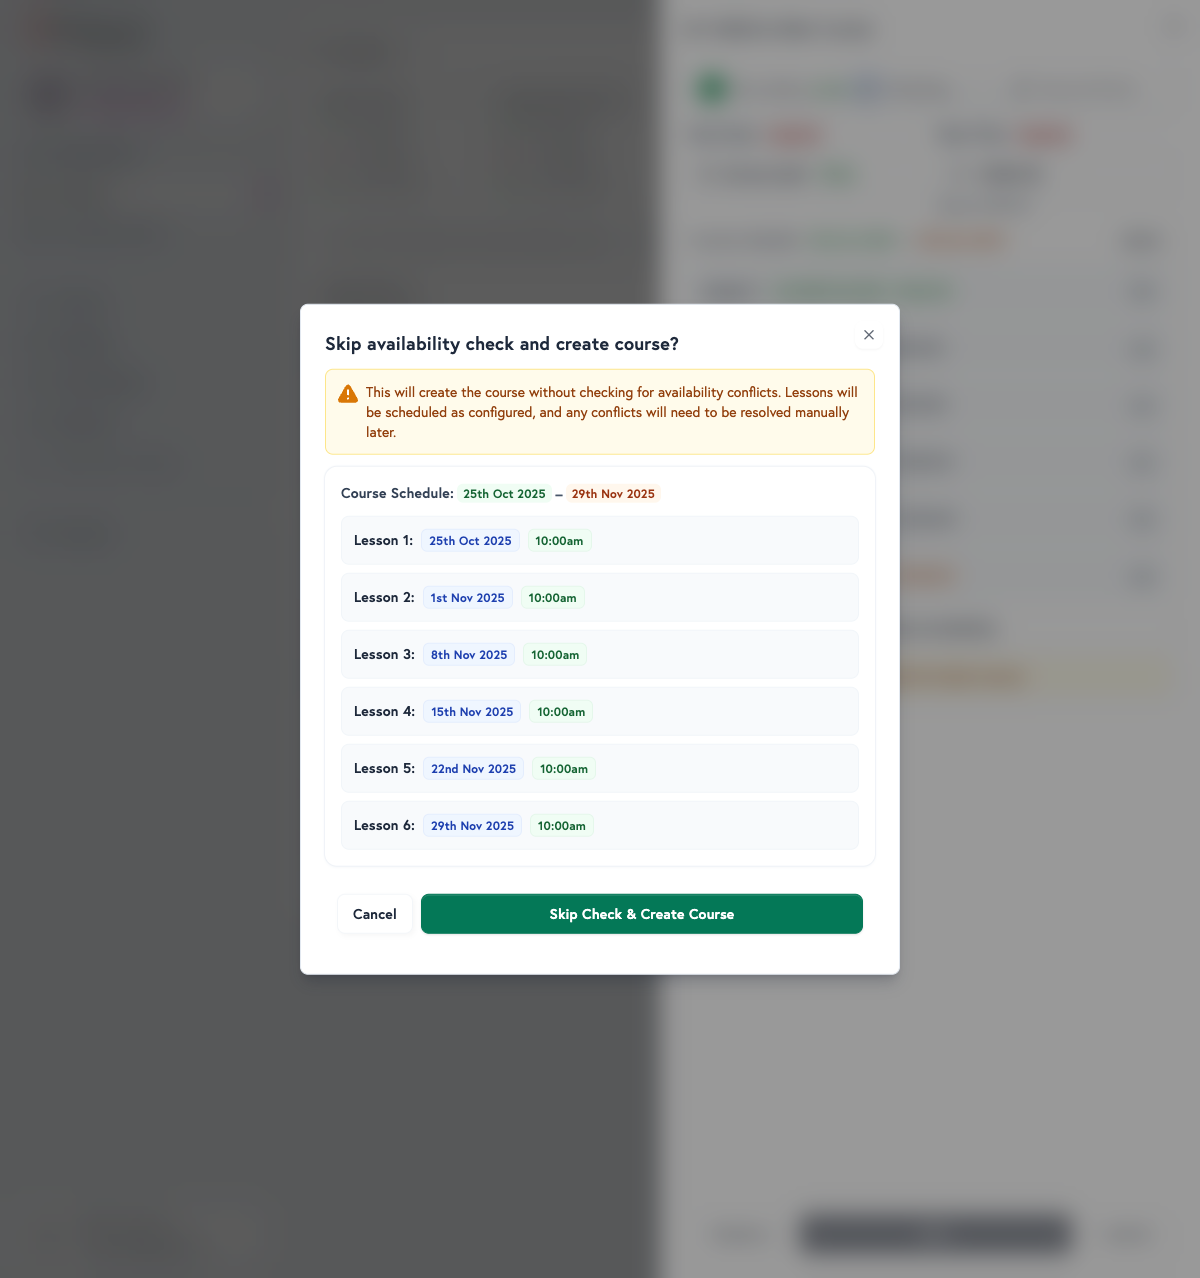
Check Availability checks the team member and the resource for every lesson, finds conflicts and suggests another time. Once it has run, the button reads Re-check Availability; run it again after you change a lesson. Skip Check & Create Course creates the course without checking: its dialog, Skip availability check and create course?, lists the whole schedule for you to check that no lesson falls on a closure and that the instructor and resource are free, then Skip Check & Create Course creates it. Any conflicts are then yours to resolve later.
Resolve availability conflicts
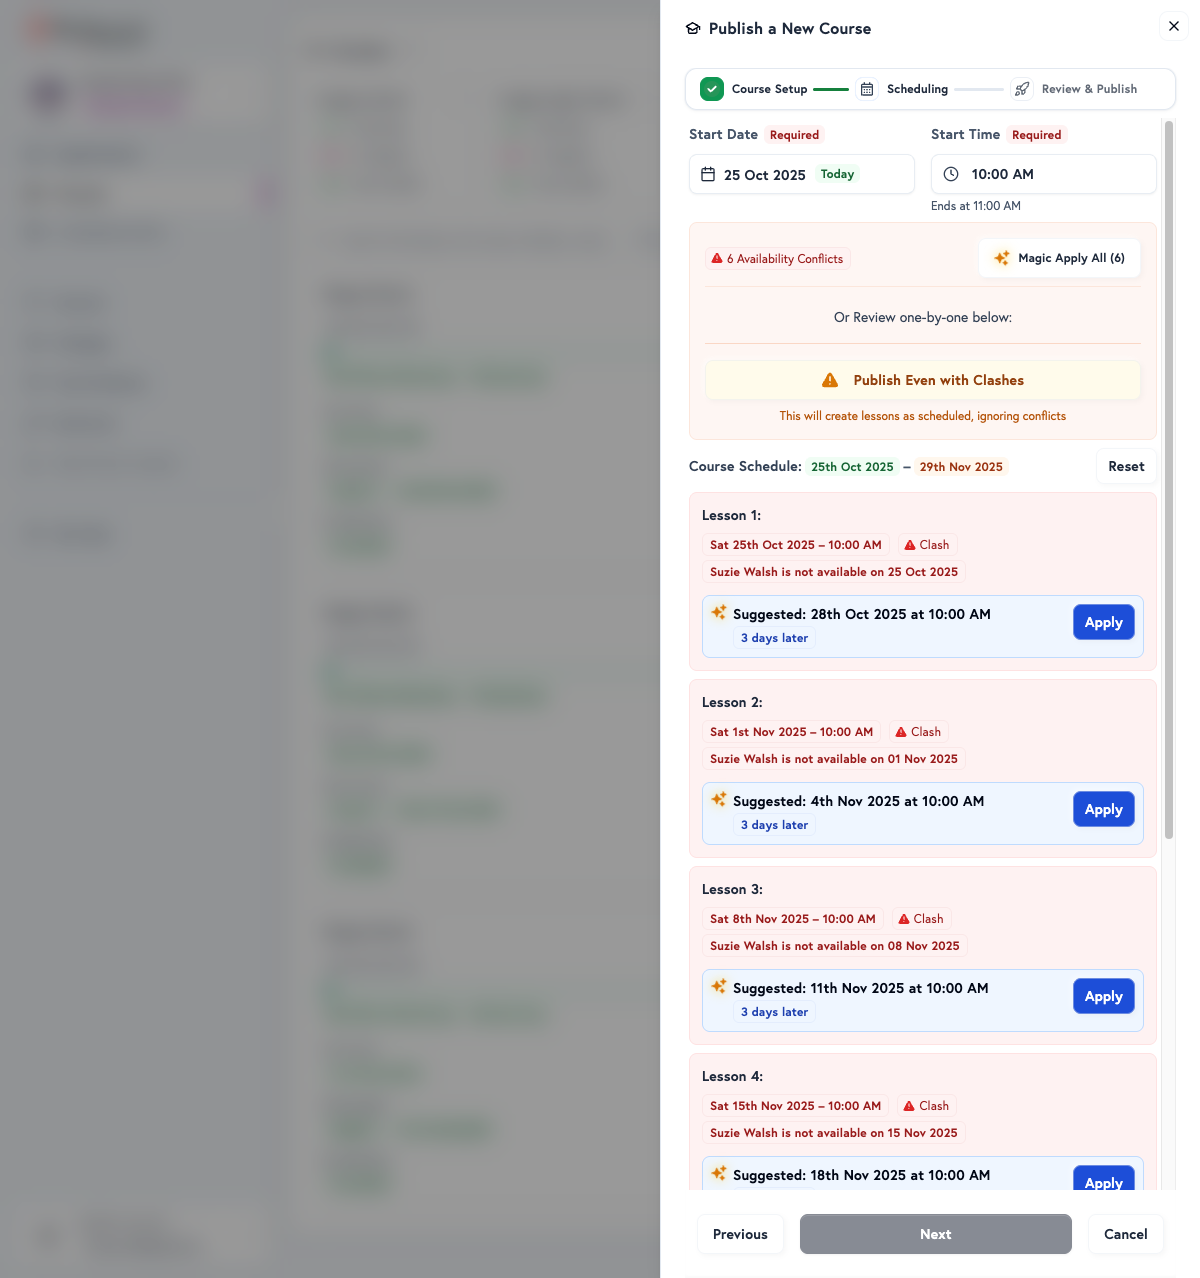
When the check finds conflicts, the form shows how many under Availability Conflicts, and each lesson with a problem carries a Clash badge, the reason (for example, a team member not available that day), a suggested date and time, and how much later it is, such as 3 days later.
- To take every suggestion, select Magic Apply All, which reads with the number of conflicts.
- To take one suggestion, select Apply on that lesson, or select Edit and set the date yourself.
- Select Re-check Availability to confirm the new times are clear.
To publish with the conflicts in place, select Publish Even with Clashes. The form marks the course as published without availability validation, and the publish button reads Force Publish New Course. Cancel Force Mode turns this off again.
Review & Publish
Review & Publish shows the course as it will be created: the template, the team member, the location and every lesson date. If the form flags Required fields, fill them before it lets you publish. If the lesson dates do not follow the template's regular cadence, tick Yes, these dates & times are correct to confirm them.
Find your published course
Once published, the course appears on Courses as Upcoming, with no pets enrolled, every lesson scheduled on the calendar and places open for enrolment.
- Open Courses.
- Find the course by its name, status and dates.
- Select Manage on it, then View Course, Enrol Pet, Move Pet, Reschedule Course or Cancel Course.
Each course shows its status (Upcoming or In Progress, and completed once it finishes), its first or next lesson and its end date, the places left, such as 4 Places Remaining (Course Full when there are none), and the pets enrolled. Move Pet appears once a pet is enrolled.
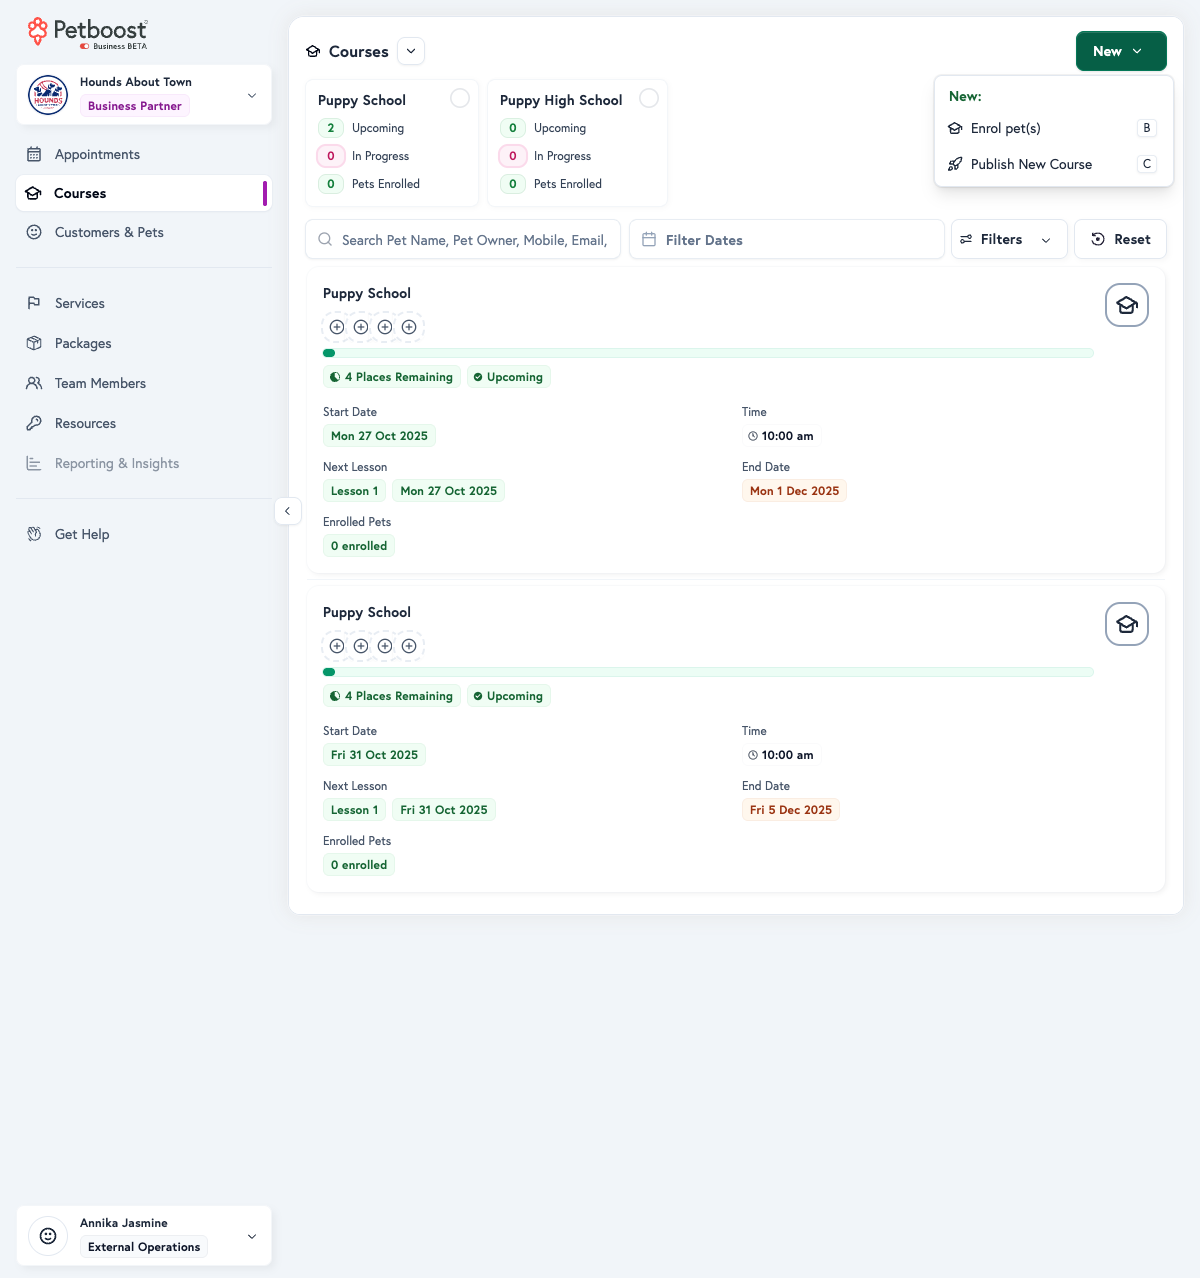
The New menu on Courses also holds Enrol pet(s), to add pets to an existing course, and Publish New Course, for another course from any template.
Plan your courses
Publish two to four weeks ahead, to leave time for promotion and enrolments and give customers notice. Choose days and times that suit your customers' working week, and avoid holiday periods for start dates. Start a new programme with a conservative capacity and raise it as demand shows.
To run a programme more than once, publish several courses from the same template, on different days or times, or with different instructors:
| Course | When | Instructor |
|---|---|---|
| Puppy School | Monday mornings | First trainer |
| Puppy School | Thursday evenings | Second trainer |
| Puppy School | Saturday mornings | First trainer |
Before the first lesson, dates, times, the instructor and the location are easy to change with Reschedule Course. Once the course has started, a change affects every enrolled pet, so tell each customer what is changing.
Troubleshooting
"Course template not available"
The template may be missing, archived or not set up. Create one from Courses with New, then New Course Template, and check it is active.
"Instructor unavailable"
Check the team member's working hours, capacity and existing bookings on Team Members, and that they are an eligible instructor on the template.
"Location unavailable"
The resource may be at capacity or outside its working hours. Check its hours and set-up on Resources.
Next steps
- Managing Enrolments: enrol pets and manage class capacity
- Course Lifecycle: track progress and manage active courses
- Getting Started with Courses: course structure and templates
- Creating Your First Course Template: step-by-step first-time setup
- Course FAQ: common questions answered
Course lessons also show as appointments on Appointments. Course booking rules sit under Booking Settings, messages under Notifications, and automated steps under Automatic Actions.